How to Install A Lift Rod in A Bathroom Sink Step by Step
Pop up stoppers have become a must-have accessory for bathroom sinks, but they come with a few downsides. For example, pop-up stoppers cannot stay partially open, and when there is sediment in the drain, it is cumbersome to reach in and press the stopper. And the lift rod solves this problem very well. However, it seems difficult to install the lift rod in a bathroom sink. Take it easy! In this guide, we will show you how to install a lift rod in a bathroom sink step by step and focus on every detail that should be paid attention to. With this post, you can install the lift rod pop up bathroom sink drain by yourself without further ado!
Tools and materials:
The followings are the tools that you need to prepare
- Plumber’s Tape
- Basin Wrench
- Thread Sealant
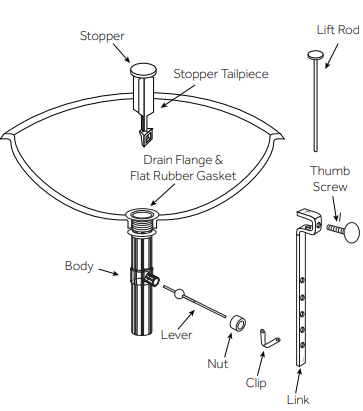
Ensure that you have gathered all of the required materials that are needed for the installation (As image below shown).

Steps to install a lift rod in a bathroom sink
Step 1. Remove the flange by unthreading it from the drain body. Remove the flat rubber gasket as well.

Step 2. Set the flat rubber gasket over the drain hole in your sink, then insert the flange into the drain hole.

Step 3. From beneath the sink, reattach the flange by threading it back onto the drain body.

Step 4. Connect the drain lever by threading it into the hole on the side of the drain body. The lever must pass through the hole in the stopper tailpiece to function properly. Apply a bit of thread sealant or plumber’s tape to the threads before attaching.

Step 5. Position the drain so that the lever is facing the back of the fixture, in line with the faucet’s lift rod. While holding in place, hand tighten the lock nut until secure then finish tightening with a basin wrench. Be careful not to overtighten, which can crack a fragile sink.

Step 6. If not already installed, insert the faucet’s lift rod into its designated hole on the back of the faucet.

Step 7. Use the link to attach the faucet’s lift rod to the drain lever. Pinch the metal clip located on the drain lever to remove. Slide one end of the clip back onto the lever, followed by the link, then the second end of the clip to secure.

Step 8. Attach the lift rod to the top of the link and secure it by tightening the thumb screw.

Step 9. Make any final adjustments to the positioning of the link and drain lever as needed. Adjust until the drain fully opens and closes.

Step 10. Fill your sink to check for any leaks and to ensure that the drain is functioning properly

Final Thoughts
It seems difficult to install the lift rod. With this guide, you can install a lift rod in a bathroom sink by yourself. If you are interested in pop up sink drains, here are some top rated Pop Up Drain Assembly with Lift Rod:
WOWOW Pop Up Drain Assembly with Lift Rod
 WOWOW Faucets


您好!Please sign in