When it comes to installing fixtures such as faucets, soap dispensers, or water filters on a granite kitchen countertop, determining the correct hole size and location is a critical step. Mistakes can be costly, as granite is not only expensive but also difficult to alter once the holes are drilled. Proper planning ensures that everything fits perfectly, looks aesthetically pleasing, and functions well in your kitchen. Here’s a guide on how to determine the hole size and location for fixtures on a granite kitchen counter.
1. Understand the Fixtures
Before you begin, it’s essential to know what fixtures you plan to install. Common items include:
- Kitchen faucets
- Soap dispensers
- Water filter faucets
- Spray hoses
- Instant hot water dispensers
Each of these requires a specific hole size, and the location of each hole is important for both functionality and appearance.
2. Refer to Manufacturer’s Specifications
Every fixture comes with a set of manufacturer’s specifications, which are crucial when determining the hole size. These specifications will typically include:
- Diameter of the hole required
- Minimum and maximum thickness of the countertop the fixture can accommodate
- Clearance requirements, such as the distance from the wall or sink
For example, most kitchen faucets require a hole size between 1 3/8 inches and 1 1/2 inches in diameter. Soap dispensers and water filter faucets might need smaller holes, around 1 1/4 inches. Always double-check these measurements in the installation manual provided with your fixtures.
3. Determine the Number of Holes Required
Next, decide how many holes you need. This largely depends on the type of faucet and additional accessories you want to install. A standard setup might include:
- Single-hole faucet: Many modern faucets require just one hole, which simplifies installation and creates a cleaner look.
- Three-hole faucet: This setup is typical for faucets with separate handles for hot and cold water.
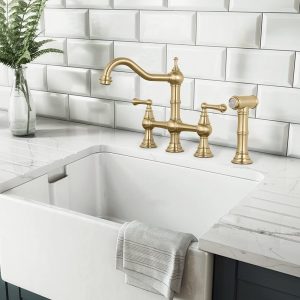
- Four-hole configuration: In addition to the faucet, you might want a separate hole for a soap dispenser, a sprayer, or a filtered water faucet.
Make sure to account for all the components before determining the layout on the granite countertop.
4. Planning the Layout
Careful planning of the layout is essential to ensure that all fixtures are functional and aesthetically pleasing. Consider the following when deciding on the hole locations:
- Distance from the sink: The faucet should be close enough to the sink to allow water to flow directly into the basin without splashing over the sides.
- Spacing between holes: If you’re installing multiple fixtures, ensure there’s enough space between them to allow easy use and cleaning. A typical distance between holes is 4 inches, but this can vary depending on the size of the fixtures.
- Clearance from the backsplash: Ensure that there is sufficient space between the faucet and the backsplash so that the handle operation is not hindered. A general rule is to leave at least 1 inch between the faucet hole and the backsplash.
- Consider existing plumbing: The location of the existing plumbing under the countertop will also affect where you can place the holes. The faucet and other fixtures should align with the plumbing to avoid complicated and costly modifications.
5. Use a Template
Many manufacturers provide a paper or cardboard template that you can use to mark the hole locations on the granite. If a template is not available, you can create one by tracing the base of the fixture on a piece of paper.
- Position the template on the countertop according to your layout plan.
- Mark the center of each hole with a pencil or a piece of masking tape, which can help prevent the drill bit from slipping on the smooth granite surface.
6. Consider Future Needs
When planning the hole locations, think about potential future upgrades or changes. For example, you might want to leave space for a soap dispenser or a water filtration system, even if you don’t plan to install them right away.
7. Consult a Professional
Granite is an expensive and unforgiving material to work with, and drilling holes requires specialized tools and expertise. While some homeowners might feel comfortable tackling this task themselves, it’s often best to consult a professional stone fabricator or installer. They will have the right equipment, such as diamond-tipped drill bits, and the experience to drill the holes without cracking or damaging the granite.
8. Test the Placement
Before drilling any holes, double-check the placement by temporarily positioning your fixtures on the countertop. This allows you to visualize the final layout and make any adjustments before it’s too late.
9. Mark the Final Hole Locations
Once you’re satisfied with the layout, use a pencil, masking tape, or a felt-tip marker to mark the exact center of each hole on the granite surface. Double-check all measurements and ensure that the marks are aligned with your original plan.
10. Drilling the Holes
If you decide to drill the holes yourself, ensure you have the right tools, including:
- Diamond-tipped drill bit: This is essential for drilling through granite, as other types of drill bits won’t be able to cut through the hard stone.
- Drill guide: This helps keep the drill bit steady and ensures a clean, precise hole.
- Water for cooling: Drilling granite generates a lot of heat, so you’ll need to continuously cool the bit with water to prevent it from overheating and damaging the stone.
Begin drilling at a slow speed, applying gentle pressure. Let the drill bit do the work—forcing it can cause the granite to crack. Continuously apply water to the drilling area to keep it cool and reduce dust.
11. Final Installation
After the holes are drilled, you can proceed with installing your fixtures according to the manufacturer’s instructions. Be sure to apply a bead of silicone sealant around the base of each fixture before securing it in place. This helps prevent water from seeping under the fixtures and into the granite, which could cause staining or other damage over time.
Conclusion of Hole Size and Location on Granite Kitchen Counter
Determining the hole size and location on a granite kitchen countertop requires careful planning, precise measurements, and the right tools. Whether you’re installing a new faucet, adding a soap dispenser, or setting up a water filter, following these steps will help ensure that your granite countertop remains beautiful and functional for years to come.
 WOWOW Faucets