
If you hear the “tick” sound when the kitchen sink is full of dirty dishes and water, it is likely that the sink drain pipe is leaking (usually called a sink filter). Fortunately, with the right tools and some elbow grease, you can remove all stubborn rust on the sink drain by yourself, and you can even install a new drain without calling a plumber! This post covers the required tools and the detailed steps of replace a kitchen sink strainer.
Table of Content
What is a strainer
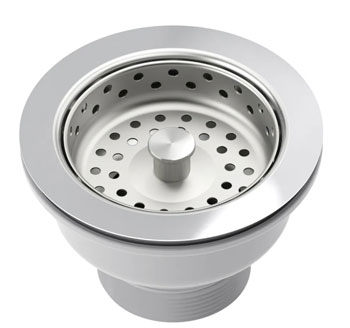
The strainer, also called collar or sleeve, is an accessory that connects the sink to the return pipe. It is equipped with one or two seals (rubber washers), an anti-friction washer, a lock nut and a union nut. In addition, the strainer of the kitchen sink is equipped with a basket plug. The basket can not only block the drainage hole, but also collect waste during the flow of water.
Required tools to replace a kitchen sink strainer
Before you start replacing a kitchen faucet strainer, prepare the following tools in advance.
- Channel-type pliers
- Plumber’s putty
- 1 A new sink strainer (match the color of your existing strainer)
Steps of how to replace a kitchen sink strainer
Step 1: Remove the water tank filter
First thing to do is to remove the pipe connected to the old tank filter. Loosen the sliding nut on the drain pipe joint with grooved pliers, and then pull the drain elbow off the tailpipe of the sink filter.
Step 2: Prepare drain and sink filters
Clean the area around the water tank opening before installing a new strainer. The old strainer may produce considerable deposits, but it should be cleaned relatively quickly.
Separate the parts of the basket filter and expand them within reach. Loosen the screws on the holder.
Step 3: Apply plumber’s putty
Roll the wide plumber putty rope into a uniform width. Wrap it around the bottom of the filter under the lip.
Place the filter into the sink drain, taking care to center it and align it as needed. Gently push down to make the putty stick to the sink slightly.
Step 4: Sink strainer with putty
From the bottom of the sink, first place the flexible washer on the body of the sink filter, and then place the metal washer in place. Fix them in place.
Screw in the holder before tightening the screws. Next, tighten the screws evenly and firmly by hand. If you need to tighten a little more, use a screwdriver or pliers to complete the tightening. Be careful not to tighten too tightly to prevent the rubber gasket from extruding from the filter under the water tank.
Tips
If the gasket is squeezed out anyway, try removing the gasket and using additional putty on top of the metal gasket.
Step 5: Reinstall the drain
Finally, reinstall the sink drain in the reverse order of removal. Open the water and check for leaks.
Bottom Line
As you can see,replacing a kitchen sink strainer is such an easy job that anyone can do that without further ado. Many things are so simple that you don’t know until you’ve done it. So, don’t hestate to follow the guide above to change the kitchen sink strainer by yourself.
 WOWOW Faucets







您好!Please sign in